前回ではセレクタとアクションを使ってストアからデータにアクセス手段を紹介しました。
WordPressのブロック開発メモ その9 データの操作(セレクタとアクション&ディスパッチ)
ストアはWordPressでいくつか用意されていますが、今回はストアを自分で定義する方法についてです。
自作のストアを作成する
ストアを作成するにはcreateReduxStore()を使用します。
mystore.ts
import { createReduxStore, register } from "@wordpress/data";

type IState =
{
    price: number;
}

const DEFAULT_STATE: IState = { price: 100 }

export const store = createReduxStore(
    'my-store',
    {
        actions:
        {
            setPrice: (price: number) =>
            {
                return { type: 'SET_PRICE', price }
            },
            upPrice: (up: number) =>
            {
                return { type: 'UP_PRICE', up }
            }
        },

        reducer: (state: IState = DEFAULT_STATE, action) =>
        {
            switch(action.type)
            {
                case 'SET_PRICE':
                    return {
                        ...state,
                        price: action.price
                    }
                case 'UP_PRICE':
                    return {
                        ...state,
                        price: state.price + action.up
                    }

            }

            return state;
        },

        selectors:
        {
            getPrice(state)
            {
                return state.price;
            },
            getTaxPrice(state, taxRate = 1.08)
            {
                return Math.floor(state.price * taxRate);
            }
        }
    }
)

register(store);
edit.tsx
import React from 'react';
import { useBlockProps } from '@wordpress/block-editor';
import { BlockEditProps } from '@wordpress/blocks';

import KurageExampleBlockProps from './props';
import './editor.scss';

import { store as myStore } from './mystore';
import { useDispatch, useSelect } from '@wordpress/data';
import { Button } from '@wordpress/components';

export default (props: BlockEditProps<KurageExampleBlockProps>) =>
{
    // @ts-ignore
    const price = useSelect(select => select(myStore).getPrice());

    // @ts-ignore
    const taxPrice = useSelect(select => select(myStore).getTaxPrice(1.1));

    const { upPrice } = useDispatch(myStore);

    const onUpPrice = (up: number) =>
    {
        upPrice(up);
    }

    return (
        <div {...useBlockProps()}>

            <p>価格: {price}</p>
            <p>税込み価格: {taxPrice}</p>

            <Button variant="primary" onClick={e => onUpPrice(10)}>10円アップ</Button>
            <Button variant="primary" onClick={e => onUpPrice(20)}>20円アップ</Button>
            <Button variant="primary" onClick={e => onUpPrice(30)}>30円アップ</Button>
        </div>
    );
}
何ら実用性のないコードですがストアを理解するためだけのコードになってます。
stateにはpriceだけ存在しています。
これは価格を表し、デフォルトの価格が100になってます。
ボタンを押すとそれぞれ10, 20, 30だけ価格がプラスされるアクションをディスパッチします。
セレクタを使用して価格と、それに消費税1.1を掛けたものが税込み価格(taxPrice)が表示されます。
これまでWordPress本体に用意されていたストアを取得してきたように、自分で作成したストア(mystore.ts)から取得できます。
import { store as myStore } from './mystore';セレクタもuseSelect()を使って以下のように出来ます。
const price = useSelect(select => select(myStore).getPrice());アクションも以下のようにしてディスパッチ出来ます。
const { upPrice } = useDispatch(myStore);
upPrice(30);createReduxStore()の第二引数を見ていきましょう。
まずはactionsです。
actions:
{
    setPrice: (price: number) =>
    {
        return { type: 'SET_PRICE', price }
    },
    upPrice: (up: number) =>
    {
        return { type: 'UP_PRICE', up }
    }
},
名前の通りアクションを作成します。
ここで定義した関数はuseDispatch()の戻り値から取得出来ます。
const { upPrice } = useDispatch(myStore);reducerについては言うまでもないので飛ばします。
selectorsにはセレクタの関数を定義します。
selectors:
{
    getPrice(state)
    {
        return state.price;
    },
    getTaxPrice(state, taxRate = 1.08)
    {
        return Math.floor(state.price * taxRate);
    }
}最初の引数がstateであることに注意してください。
それ以降の引数はselect()から取得した関数の引数になります。
ここで定義した関数はuseSelect()から次のように取得出来ます。
const price = useSelect(select => select(myStore).getPrice());
const taxPrice = useSelect(select => select(myStore).getTaxPrice(1.1));
それぞれ定義側と実行側の引数に注目してください。
getPrice(state) -> getPrice()
getTaxPrice(state, taxRate = 1.08) -> getTaxPrice(1.1)
ブラウザから実行
ところで今回定義したストアはブラウザからも実行できます。
wp.data.select('my-store').getPrice()
100
wp.data.dispatch('my-store').upPrice(777)
Promise {<fulfilled>: {…}}
wp.data.select('my-store').getPrice()
877select()やdispatch()に指定するストア名はcreateReduxStore()の第一引数で指定した名前ですね。
非同期が絡んでくるストア
次に非同期が絡んでくるストアです。
例えばREST APIなどサービスからデータを持ってくる場合・・・。
オプションのactionsとresolversについてです。
- 情報がほとんどなくて間違っている可能性があります!
actions
まずはactionsです。
mystore.ts
import { createReduxStore, register } from "@wordpress/data";

const sleep = (timespan: number) => new Promise(r => setTimeout(r, timespan));

const myData =
{
    apple: 'りんごりんごりんごろごろごろ!',
    banana: 'ばにゃーにゃにゃーにゃにゃーにゃー',
}

// 3秒したらidからデータを取得するWeb APIを想定
const myFetch = async (id: string) =>
{
    await sleep(3000);
    return myData[id] ?? 'Not found!';
}

type IState =
{
    message: string;
    state: string;
}

const DEFAULT_STATE: IState = {
    message: '',
    state: ''
}

type ActionType =
    'SET_MESSAGE' |
    'SET_STATE';

const reducer = (state: IState = DEFAULT_STATE, action) =>
{
    switch(action.type as ActionType)
    {
        case 'SET_MESSAGE':
            return { ...state, message: action.message }
        case 'SET_STATE':
            return { ...state, state: action.state }
    }

    return state;
}

const actions =
{
    setState(state)
    {
        return { type: 'SET_STATE', state};
    },

    setMessage(message)
    {
        return { type: 'SET_MESSAGE', message }
    },

    updateMessageAsync(id: string)
    {
        return async( {dispatch, select, registry } ) =>
        {
            //
            // dispatch({ type: 'SET_STATE', state: `Loading... ${id}!`});
            // dispatch(actions.setState(`Loading... ${id}!`));
            //
            // 以下は↑でもいい。
            //
            dispatch.setState(`Loading... ${id}!`);

            const data = await myFetch(id);

            dispatch.setMessage(data);
            dispatch.setState(`Loaded... ${id}!`);

        }
    },

}

const selectors =
{
    getState(state)
    {
        return state.state;
    },

    getMessage(state)
    {
        return state.message;
    }
}

export const store = createReduxStore(
    'my-store',
    {
        reducer,
        actions,
        selectors
    }
)

register(store);
edit.tsx
import React from 'react';
import { useState } from '@wordpress/element';
import { useBlockProps } from '@wordpress/block-editor';
import { BlockEditProps } from '@wordpress/blocks';

import KurageExampleBlockProps from './props';
import './editor.scss';

import { store as myStore } from './mystore';
import { useDispatch, useSelect } from '@wordpress/data';
import { Button, TextControl } from '@wordpress/components';

export default (props: BlockEditProps<KurageExampleBlockProps>) =>
{
    const [id, setId] = useState('');

    // @ts-ignore
    const [message, state] = useSelect(select => {
        const s = select(myStore);
        return [s.getMessage(), s.getState()];
    });

    const { updateMessageAsync } = useDispatch(myStore);

    const onBanana = () =>
    {
        updateMessageAsync(id);
    }

    return (
        <div {...useBlockProps()}>

            <h2>Actions</h2>
            <p>state: {state}</p>
            <p>message: {message}</p>

            <TextControl value={id} onChange={setId} />
            <Button variant="primary" onClick={e => onBanana() }>クリック</Button>
        </div>
    );
}まずはactions.updateMessageAsync(id: string)を見てください。
ボタンを押すと入力値を引数にこの関数が実行されます。
dispatch.setState(Loading... ${id}!);まずaction.setState()のアクションをディスパッチします。
読み込み中なのでLoading... を状態stateに渡します。
これは以下のようにすることもできます。
dispatch({ type: 'SET_STATE', state: Loading... ${id}!});

dispatch(actions.setState(Loading... ${id}!));
そしてWeb APIなどの非同期処理を模擬した関数myFetch()を実行します。
const data = await myFetch(id);idはappleとbananaの二つを受け取ります。
それ以外を渡すとNot Found!が返ってきます。
この関数は非同期で処理に3秒ほど掛かります。
するとデータが返ってくるので今度はsetMessage()をディスパッチします。
dispatch.setMessage(data);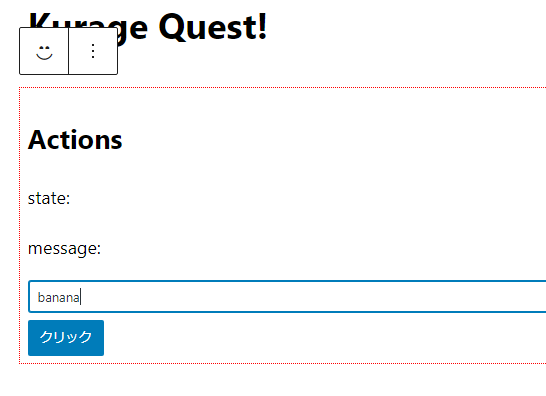
bananaを入力してボタンを押します。
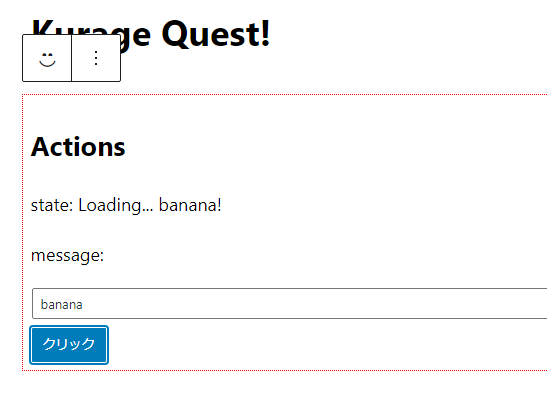
3秒ほどLoading... が表示されます。
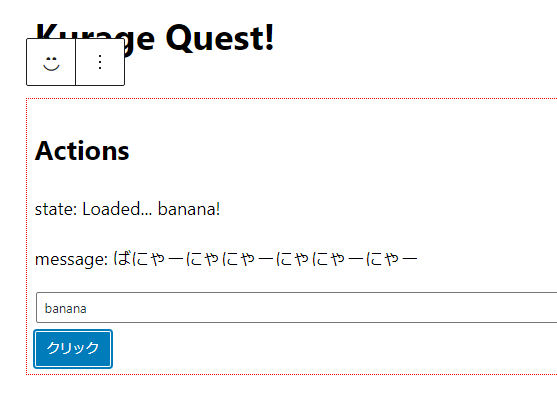
結果が状態messageに反映されます。
resolvers
セレクタは状態から欲しいデータを取得します。
ただ中には非同期処理が必要で直ぐには取得出来ないデータもあります。
例えば特定の投稿をセレクタから取得したい場合などです。
これはREST APIから取得するので、セレクタは直ぐにデータを返せません。
そこでリゾルバがあると便利です。
リゾルバを使うとページを更新した直後、あるいは引数に変更があった時に非同期な処理を実行することが出来ます。
mystore.ts
import { createReduxStore, register } from "@wordpress/data";

const sleep = (timespan: number) => new Promise(r => setTimeout(r, timespan));

const myData =
{
    apple: 'りんごりんごりんごろごろごろ!',
    banana: 'ばにゃーにゃにゃーにゃにゃーにゃー',
}

// 3秒したらidからデータを取得するWeb APIを想定
const myFetch = async (id: string) =>
{
    await sleep(3000);
    return myData[id] ?? 'Not found!';
}

type IState =
{
    message: string;
    state: string;
}

const DEFAULT_STATE: IState = {
    message: '',
    state: ''
}

type ActionType =
    'SET_MESSAGE' |
    'SET_STATE';

const reducer = (state: IState = DEFAULT_STATE, action) =>
{
    switch(action.type as ActionType)
    {
        case 'SET_MESSAGE':
            return { ...state, message: action.message }
        case 'SET_STATE':
            return { ...state, state: action.state }
    }

    return state;
}

const actions =
{
    setState(state)
    {
        return { type: 'SET_STATE', state};
    },

    setMessage(message)
    {
        return { type: 'SET_MESSAGE', message }
    }

}

const selectors =
{
    getState(state)
    {
        return state.state;
    },

    getMessage(state, id: string)
    {
        return state.message;
    }
}

const resolvers =
{

    getMessage(id: string)
    {
        return async( {dispatch, select, registry } ) =>
        {
            console.log('>>>>>>>>>>>>>>>>>>>>>>>>>>>>>>> LOADING');

            dispatch.setState(`Loading... ${id}!`);

            const data = await myFetch(id);
            dispatch.setMessage(data);

            dispatch.setState(`Loaded... ${id}!`);

        }
    },

}

export const store = createReduxStore(
    'my-store',
    {
        reducer,
        actions,
        selectors,

        // リゾルバを追加した
        resolvers
    }
)

register(store);
edit.tsx
import React from 'react';
import { useState } from '@wordpress/element';
import { useBlockProps } from '@wordpress/block-editor';
import { BlockEditProps } from '@wordpress/blocks';

import KurageExampleBlockProps from './props';
import './editor.scss';

import { store as myStore } from './mystore';
import { useDispatch, useSelect } from '@wordpress/data';
import { Button, TextControl } from '@wordpress/components';

export default (props: BlockEditProps<KurageExampleBlockProps>) =>
{
    const [id, setId] = useState('');

    // @ts-ignore
    const [message, state] = useSelect(select => {
        const s = select(myStore);
        return [s.getMessage(id), s.getState()];
    });

    return (
        <div {...useBlockProps()}>

            <h2>Resolvers</h2>
            <p>state: {state}</p>
            <p>message: {message}</p>

            <TextControl value={id} onChange={setId} />
        </div>
    );
}
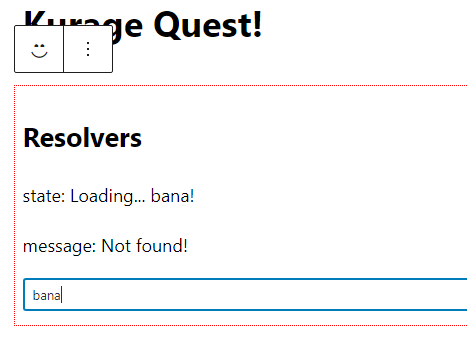
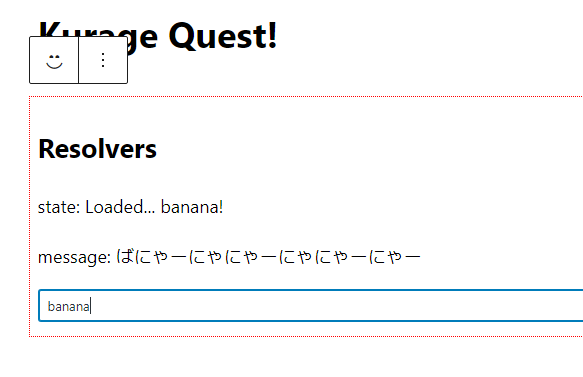
bananaとappleと入力するとそれぞれのメッセージが遅れて表示されます。
それ以外の文字を入力してもNot found!が表示されるだけです。
- ただし今回の例は実用的なものでないことに注意してください!
ではリゾルバはどういう仕組みなのか! についてです。
今回はselectors.getMessage()に引数が増えてます。
オプションresolversにresolvers.getMessage()を追加しました。
リゾルバは、セレクタに指定した関数と同じ名前をリゾルバに定義すると、そちらも実行される という機能です。
例えば、selectors.getMessage()が初めて実行された時は、それが非同期を必要とする場合すぐにはデータを取得出来ません。
その場合デフォルトで設定してあるNot found!が返ってくるだけです。
ところがselectors.getMessage()が実行される直前、resolvers.getMessage()が非同期で実行されるようになってます。
あなたはリゾルバ側では非同期処理で取得したデータをディスパッチするように実装します。
そうすることで状態が変更されselectors.getMessage()ではそのデータを取得出来るようになります。
ただし、同じ名前と引数の組合せのリゾルバは二度目以降は実行されません。
例えばresolvers.getMessage('banana')が2回以上実行されることはありません。
今回の例では、例えば「banana」と入力した場合、resolvers.getMessage()はb, ba, ban, bana, banan, banana の5回実行されることになります。
他の文字を入力後、再び「b, ba, ban, bana, banan, banana」の何れを入力してもresolvers.getMessage()は反応しないので注意してください。
ページを更新した後にブラウザで以下のような実行をしたらどうなるでしょう!?
wp.data.select('my-store').getMessage('banana');何回か実行してもNot found!がコンソールに出力されます。
ところが数秒経過するとばにゃーにゃにゃーにゃにゃーにゃーが表示されます。
wp.data.select('my-store').getMessage('banana');
'Not found!'
wp.data.select('my-store').getMessage('banana');
'Not found!'
wp.data.select('my-store').getMessage('banana');
'Not found!'
wp.data.select('my-store').getMessage('banana');
'ばにゃーにゃにゃーにゃにゃーにゃー'
前回の記事のミステリーを思い出してください。
wp.data.select('core').getEntityRecord('postType', 'post', 335);これが何故最初クリックした時はundefinedが表示されるのか、謎が解けたと思います。
このセレクタもまたリゾルバが裏で働いています(その内容はREST APIからIDが335の投稿を取得します)。
WordPressのREST APIのソースコードclass-wp-rest-request.php辺りにsleep(5)を追加するとよくわかります。
5秒の間何度実行してもundefinedですが5秒すぎるとようやく取得出来るようになります。
wp.data.select('core').getEntityRecord('postType', 'post', 335);
undefined
wp.data.select('core').getEntityRecord('postType', 'post', 335);
undefined
wp.data.select('core').getEntityRecord('postType', 'post', 335);
undefined
wp.data.select('core').getEntityRecord('postType', 'post', 335);
undefined
wp.data.select('core').getEntityRecord('postType', 'post', 335);
{id: 335, date: '2023-02-18T18:33:39', date_gmt: '2023-02-18T09:33:39', guid: {…}, modified: '2023-02-18T18:34:38', …}
リゾルバ修正
このままでは欠陥があります。
リゾルバの性質上一度受け取った引数のパターンはキャッシュされているので二度目以降同じパターンではセレクタが反応しません。
banana -> apple -> banana と順番に入力してもappleで更新されて、もうbanana用のメッセージが得られることはありません。
そこでメッセージと入力文字をセットにして状態を保存するようにカスタマイズします。
state.messageからstate.messagesに変更します。
state.messages[id]mystore.ts
import { createReduxStore, register } from "@wordpress/data";

const sleep = (timespan: number) => new Promise(r => setTimeout(r, timespan));

const myData =
{
    apple: 'りんごりんごりんごろごろごろ!',
    banana: 'ばにゃーにゃにゃーにゃにゃーにゃー',
}

// 3秒したらidからデータを取得するWeb APIを想定
const myFetch = async (id: string) =>
{
    await sleep(Math.floor(Math.random() * 5000));

    // ここは修正
    return myData[id] ?? null;
}

type IState =
{
    messages: { [key: string]: string};
    state: string;
}

const DEFAULT_STATE: IState = {
    messages: {},
    state: ''
}

type ActionType =
    'SET_MESSAGE' |
    'SET_STATE';

const reducer = (state: IState = DEFAULT_STATE, action) =>
{
    switch(action.type as ActionType)
    {
        case 'SET_MESSAGE':
            return {
                ...state,
                messages: {
                    ...state.messages,
                    [action.id]: action.message}
                }
        case 'SET_STATE':
            return { ...state, state: action.state }
    }

    return state;
}

const actions =
{
    setState(state)
    {
        return { type: 'SET_STATE', state};
    },

    setMessage(id, message)
    {
        return { type: 'SET_MESSAGE', message, id }
    }

}

const selectors =
{
    getState(state)
    {
        return state.state;
    },

    getMessage(state, id: string)
    {
        return state.messages?.[id] ?? '';
    },

    // キャッシュ一覧取得
    getCachedItems(state)
    {
        return Object.entries(state.messages);
    }
}

const resolvers =
{

    getMessage(id: string)
    {
        return async( {dispatch, select, registry } ) =>
        {

            dispatch.setState(`Loading... ${id}!`);

            const data = await myFetch(id) ?? `'${id}' is not found`;
            dispatch.setMessage(id, data);

            dispatch.setState(`Loaded... ${id}!`);

        }
    },

}

export const store = createReduxStore(
    'my-store',
    {
        reducer,
        actions,
        selectors,

        // リゾルバを追加した
        resolvers
    }
)

register(store);
ちょっと非同期処理の時間をランダムに変更してみました。
await sleep(Math.floor(Math.random() * 5000));edit.ts
import React from 'react';
import { useState } from '@wordpress/element';
import { useBlockProps } from '@wordpress/block-editor';
import { BlockEditProps } from '@wordpress/blocks';

import KurageExampleBlockProps from './props';
import './editor.scss';

import { store as myStore } from './mystore';
import { useDispatch, useSelect } from '@wordpress/data';
import { Button, TextControl } from '@wordpress/components';

export default (props: BlockEditProps<KurageExampleBlockProps>) =>
{
    const [id, setId] = useState('');

    // @ts-ignore
    const [message, state, items] = useSelect(select => {
        const s = select(myStore);
        return [
            s.getMessage(id),
            s.getState(),
            s.getCachedItems()
        ];
    });

    return (
        <div {...useBlockProps()}>

            <h2>Resolvers</h2>
            <p>id: {id}</p>
            <p>state: {state}</p>
            <p>message: {message}</p>

            <TextControl value={id} onChange={setId} />

            { items.map(([k, v]) => <div>{k}: {v}</div> )}
        </div>
    );
}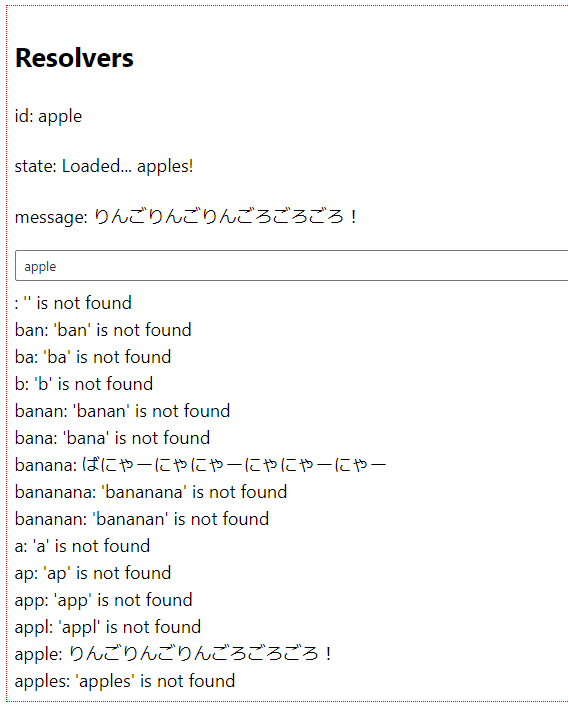
一度入力した文字をキャッシュしてます。
後は状態にstate.loadingsなんかを追加して、現在の入力文字が読み込み中かどうかの状態を作ってもいいですね。
でも、じつは・・・。
以前紹介した@wordpress/core-dataはこうした状態管理をすでに実装してあるんですね。
getEntityRecode()なんかはその典型です。
もし非同期の対象がREST APIならばこっち使った方が便利です。
リゾルバのことを知ると以下のページの説明の一部が分かりやすくなります。
registry
ところで非同期関数の引数registryってなんだろな!?
import { store as coreStore } from '@wordpress/core-data';

const resolvers =
{

    getMessage(id: string)
    {
        return async( {dispatch, select, registry } ) =>
        {
            console.log('>>>>>>>>>>>>>>>>>>>>>>>>>>>>>>> LOADING');

            dispatch.setState(`Loading... ${id}!`);

            const data = await myFetch(id);
            dispatch.setMessage(data);

            // 他のストアを読み込んだり出来る。
            const { getEntitiesConfig } = registry.resolveSelect(coreStore);
            const config = await getEntitiesConfig('postType');
            console.log(config);

            dispatch.setState(`Loaded... ${id}!`);

        }
    },
}
こんな使い方が出来る。
select
同じくselectは
const resolvers =
{

    getMessage(id: string)
    {
        return async( {dispatch, select, registry } ) =>
        {
            console.log('>>>>>>>>>>>>>>>>>>>>>>>>>>>>>>> LOADING');

            dispatch.setState(`Loading... ${id}!`);

            const data = await myFetch(id);
            dispatch.setMessage(data);

            // 場外を取得したり出来る。
            const nowMessage = select.getMessage(id);
            console.log(nowMessage);

            dispatch.setState(`Loaded... ${id}!`);

        }
    },

}
内部的な動作
リゾルバがどのように実装されているかを紹介してます。
WordPressのブロック開発メモ その10ー1 リゾルバの解読
controls
オプションにcontrolsを見かけます。
非同期のactionsがあるのでもう必要ない機能なのかもしれません。
昔のやり方、なのかな?
知らないとモヤモヤするので一応試してみました。
わざわざ学ぶ必要無いと思います。
情報探しきれず、試行錯誤してたら動きました。
程度の内容なので間違ってる可能性が高いことを前提にしてます。
mystore.ts
import { createReduxStore, register } from "@wordpress/data";

const sleep = (timespan: number) => new Promise(r => setTimeout(r, timespan));

type IState =
{
    message: string;
    random: number;
    square: number;
}

const DEFAULT_STATE: IState = { random: 0, square: 0, message: '' }

export const store = createReduxStore(
    'my-store',
    {
        controls:
        {
            async GENERATE_RANDOM(action)
            {
                await sleep(3000);
                return Math.floor(Math.random() * 100) + 1;
            },

            async SQUARE(action)
            {
                await sleep(5000);
                return action.value * action.value;
            }
        },

        actions:
        {
            updateState: function*(nbr: number)
            {
                yield { type: 'SET_MESSAGE', message: '乱数を作成してます' }
                const random = yield { type: 'GENERATE_RANDOM' }

                yield { type: 'SET_MESSAGE', message: '二乗してます' }
                const square = yield { type: 'SQUARE', value: nbr }

                yield { type: 'SET_MESSAGE', message: '状態を作成し終わりました' }
                yield { type: 'SET_STATE', random, square }
            },
        },

        reducer: (state: IState = DEFAULT_STATE, action) =>
        {
            switch(action.type)
            {
                case 'SET_STATE':
                    return {
                        ...state,
                        random: action.random,
                        square: action.square
                    }
                case 'SET_MESSAGE':
                    return {
                        ...state,
                        message: action.message
                    }
            }

            return state;
        },

        selectors:
        {
            getRandom(state)
            {
                return state.random;
            },
            getSquare(state)
            {
                return state.square;
            },
            getMessage(state)
            {
                return state.message;
            }
        }

    }
)

register(store);
edit.tsx
import React from 'react';
import { useBlockProps } from '@wordpress/block-editor';
import { BlockEditProps } from '@wordpress/blocks';
import KurageExampleBlockProps from './props';
import './editor.scss';
import { store as myStore } from './mystore';
import { useDispatch, useSelect } from '@wordpress/data';
import { Button } from '@wordpress/components';
export default (props: BlockEditProps<KurageExampleBlockProps>) =>
{
// @ts-ignore
const [random, square, message] = useSelect(select => {
const s = select(myStore);
return [s.getRandom(), s.getSquare(), s.getMessage()];
});
const { updateState } = useDispatch(myStore);
return (
<div {...useBlockProps()}>
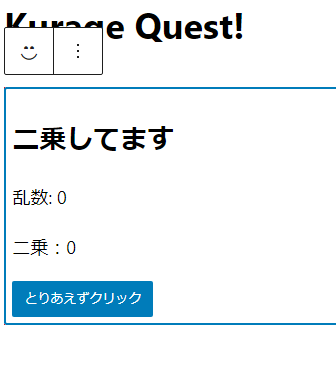
<h2>{message}</h2>
<p>乱数: {random}</p>
<p>二乗:{square}</p>
<Button variant="primary" onClick={e => updateState(12) }>とりあえずクリック</Button>
</div>
);
}ボタンを押すとupdateState(12)が実行されます。
1~100までの乱数作成と、12の二乗を計算します。
実行結果です。
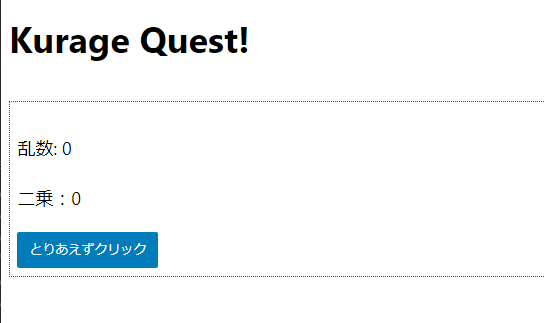
↓ボタンを押した直後

↓3秒たった時
↓5秒たった時
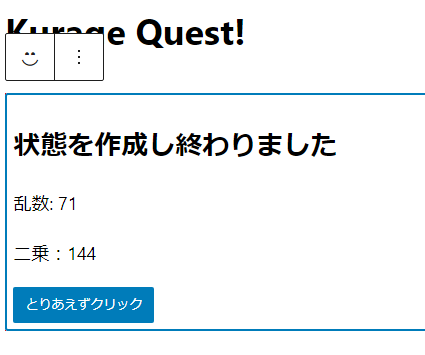
えーと、乱数を作成するのに3秒、二乗するのに5秒かかる不思議な世界のお話です。
状態は乱数を保持するrandomと、二乗した結果を保持するsquare、そして現在の進捗状況を示すmessageの3つがあります。
注目すべき点はactionsオプションで定義したupdateState()関数です。
乱数を作成し、引数の値を二乗するという、いたってどうでもいい関数です。
今までとの違いはこの関数はコルーチンを使っている点です。
このコルーチンはGENERATE_RANDOM、SQUARE, SET_MESSAGEの三つのアクションを返してます。
そしてこれらのアクションはcontrolsオプションにアクション名と同じ関数があるとそちらを実行してます。
controlsにAPIとかいわゆる副作用を閉じ込めているような感じです。
次回はREST APIについてです。