API Fetch について
WordPressのブロック開発メモ その11 REST API へのアクセス
基本的な REST API
WordPressでREST APIを使う前編
WordPressでREST APIを使う後編 REST APIの登録と REST コントローラ
REST API コントローラの実装
(σ・ω・)σ WP_REST_Controller メソッド前編
WP_REST_Controller メソッド後編 追加フィールド
WordPress REST API Controllerを実装してみる。
コントローラの実装
WordPressのREST APIはWP_REST_Controllerの派生クラスで実装されています。
投稿タイプであればWP_REST_Posts_Controllerで実装されており、コメントであればWP_REST_Comments_Controllerで実装されてます。
今回はWP_REST_Controllerを詳しく見ていきます。
add_action('rest_api_init', function(){

    $controller = new class extends WP_REST_Controller
    {
        public function register_routes()
        {
            register_rest_route(
                'wp/v2',
                '/osakana',
                [
                    'methods' => 'GET',
                    'callback' => fn(WP_REST_Request $r) => rest_ensure_response('Hello Kurage!')
                ]
            );
        }

    };

    $controller->register_routes();
});やってることは$this->register_routes()メソッド内でregister_rest_route()関数を呼び出してるだけですね。
名前空間+ルートを/wp/v2/osakanaに変更したことに注意してください。
では早速このルートにアクセスしてみます。
await wp.apiFetch({path: '/wp/v2/osakana'})Hello Kurage!JSONスキーマ
REST APIが受け取るクエリの検証をregister_rest_route()のargsで指定することは説明しました。
JSONスキーマはWordPressやPHPの範囲外ことですが軽く解説します。
名前の通り検証類をJSONで定義するものです。
前回は直接argsに指定してました。
argsでの指定
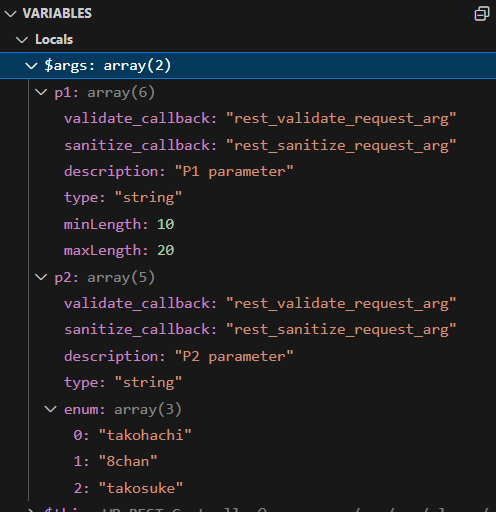
            // 検証
            'args' =>
            [
                'p1' =>
                [
                    'description' => 'P1 parameter',
                    'type' => 'string',
                    'minLength' => 10,
                    'maxLength' => 20
                ],
                'p2' =>
                [
                    'description' => 'P2 parameter',
                    'type' => 'string',
                    'enum' => ['takohachi', '8chan', 'takosuke']
                ]
            ]
もしJSONスキーマで書くならこのようになります。
JSONスキーマでの指定
{
    "$schema": "http://json-schema.org/draft-04/schema#",
    "title": "kurage",
    "type": "object",
    "properties": {
        "p1": {
            "description": "P1 parameter",
            "type": "string",
            "minLength": 10,
            "maxLength": 10
        },
        "p2": {
            "description": "P2 parameter",
            "type": "string",
            "enum": ["takohachi", "8chan", "takosuke"]
        }
    }
}titleには適当にkurageを、
propertiesにargsで使う設定を書いてます。
$schemaを設定しているのでIDE類を使えばインテリセンスが使えるようになります。
public function get_item_schema()
スキーマは$this->get_item_schema()で返すようにします。
add_action('rest_api_init', function(){

    $controller = new class extends WP_REST_Controller
    {
        public function register_routes()
        {
            register_rest_route(
                'wp/v2',
                '/osakana',
                [
                    'methods' => 'GET',
                    'callback' => fn(WP_REST_Request $r) => rest_ensure_response('Hello Kurage!')
                ]
            );
        }

        public function get_item_schema()
        {
            $schema = [
                '$schema' => 'http://json-schema.org/draft-04/schema#',
                'title' => 'kurage',
                'type' => 'object',
                'properties' => [
                    'p1' =>
                    [
                        'description' => 'P1 parameter',
                        'type' => 'string',
                        'minLength' => 10,
                        'maxLength' => 20
                    ],
                    'p2' =>
                    [
                        'description' => 'P2 parameter',
                        'type' => 'string',
                        'enum' => ['takohachi', '8chan', 'takosuke']
                    ]
                ]
            ];

            return $schema;
        }

    };

    $controller->register_routes();
});
でもこれだけでは意味がありません。
public function get_endpoint_args_for_item_schema( $method = WP_REST_Server::CREATABLE )
スキーマをargsで使用できるようにします。
add_action('rest_api_init', function(){

    $controller = new class extends WP_REST_Controller
    {
        public function register_routes()
        {
            // get_item_schema()から読み込み用のargsの設定値を取得。
            $args = $this->get_endpoint_args_for_item_schema(WP_REST_Server::READABLE);

            register_rest_route(
                'wp/v2',
                '/osakana',
                [
                    'methods' => 'GET',
                    'callback' => fn(WP_REST_Request $r) => rest_ensure_response('Hello Kurage!'),

                    // ここでargsを指定する。
                    'args' => $args
                ]
            );
        }

        public function get_item_schema()
        {
            $schema = [
                '$schema' => 'http://json-schema.org/draft-04/schema#',
                'title' => 'kurage',
                'type' => 'object',
                'properties' => [
                    'p1' =>
                    [
                        'description' => 'P1 parameter',
                        'type' => 'string',
                        'minLength' => 10,
                        'maxLength' => 20
                    ],
                    'p2' =>
                    [
                        'description' => 'P2 parameter',
                        'type' => 'string',
                        'enum' => ['takohachi', '8chan', 'takosuke']
                    ]
                ]
            ];

            return $schema;
        }

    };

    $controller->register_routes();
});
JSONスキーマに無いvalidate_callbackやsanitize_callbackが設定されたりしてます。
これでJSONスキーマをargsに適用します。
今回はHTTPメソッドにWP_REST_Server::READABLEを指定していることに注意してください。
await wp.apiFetch({path: '/wp/v2/osakana?context=view&p1=aaaaaaaaaaaaaaaaaaaaaaaaaaaaaaaaaa&p2=xxx'})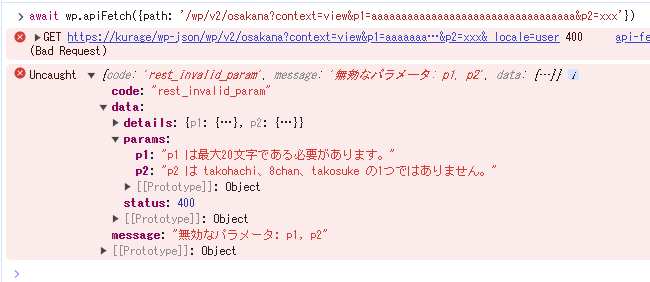
注意点
多くのコントローラ派生クラスを見ると$this->get_items_schema()の実装は、
1.キャッシュされている
2.$this->add_additional_fields_schema()が使用されている。
ことが分かります。
add_action('rest_api_init', function(){

    $controller = new class extends WP_REST_Controller
    {
        public function get_item_schema()
        {
            if($this->schema)
            {
                $this->add_additional_fields_schema($this->schema);
            }

            $this->schema = [
                '$schema' => 'http://json-schema.org/draft-04/schema#',
                'title' => 'kurage',
                'type' => 'object',
                'properties' => [
                    'p1' =>
                    [
                        'description' => 'P1 parameter',
                        'type' => 'string',
                        'minLength' => 10,
                        'maxLength' => 20
                    ],
                    'p2' =>
                    [
                        'description' => 'P2 parameter',
                        'type' => 'string',
                        'enum' => ['takohachi', '8chan', 'takosuke']
                    ]
                ]
            ];

            return $this->add_additional_fields_schema($this->schema);
        }
    };
});WP_REST_Controllerは$schemaプロパティが定義してあります。
スキーマの作成に負担がかかるような場合はキャッシュは有効そうです。
ただ、今回の例のような場合はあまり意味が無さそうです。
また $this->add_additional_fields_schema()は追加フィールド(REST APIのフィールドを後付けで追加する方法、詳しくはregister_rest_field())に関するものです。
後半で紹介します。
JSONファイルにする
もしスキーマを動的に作成しないのなら、
せっかくJSONのインテリセンスが使えるなら外部にJSONファイル作って読み込んだほうが楽そうです。
例えば./kurage-worker-ex-schema.jsonを作ったとするなら、
$controller = new class extends WP_REST_Controller
{
    public function get_item_schema()
    {
        $schema = $this->schema ?? $this->schema = $this->loadJsonFile();
        return $this->add_additional_fields_schema($schema);
    }

    protected function loadJsonFile()
    {
        $json = file_get_contents(dirname(__FILE__) . '/kurage-worker-ex-schema.json');
        return json_decode($json, true);
    }
};
コンテキストによるフィルタリング
例えば投稿のエンドポイントにはcontextパラメータが実装されてます。
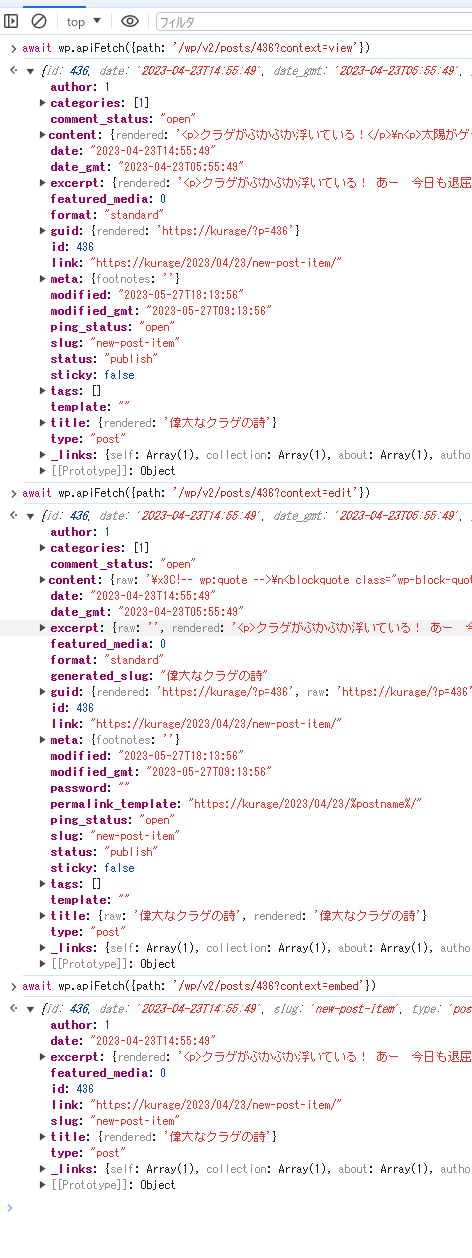
例えばIDが436の投稿を取得する場合を見ていきます。
/wp/v2/posts/436通常これでアクセスできますが、投稿はコンテキストに「view, edit, embed」が利用できます。
コンテキストを指定してアクセスしてみましょう。
viewは表示用
/wp/v2/posts/436?context=vieweditは編集時用
/wp/v2/posts/436?context=editembedは最小限欲しい時
/wp/v2/posts/436?context=embedコンテキストに渡した値によって取得出来るフィールドが変わってきます。
ちょっと分かりにくいのでそれぞれのフィールド一覧を抽出してみます。
const items = await Promise.all( ['view', 'edit', 'embed'].map( ctx => wp.apiFetch({ path: `/wp/v2/posts/436?context=${ctx}` }) ))
items.map(item => Object.keys(item))
(24) ['id', 'date', 'date_gmt', 'guid', 'modified', 'modified_gmt', 'slug', 'status', 'type', 'link', 'title', 'content', 'excerpt', 'author', 'featured_media', 'comment_status', 'ping_status', 'sticky', 'template', 'format', 'meta', 'categories', 'tags', '_links']
(27) ['id', 'date', 'date_gmt', 'guid', 'modified', 'modified_gmt', 'password', 'slug', 'status', 'type', 'link', 'title', 'content', 'excerpt', 'author', 'featured_media', 'comment_status', 'ping_status', 'sticky', 'template', 'format', 'meta', 'categories', 'tags', 'permalink_template', 'generated_slug', '_links']
(10) ['id', 'date', 'slug', 'type', 'link', 'title', 'excerpt', 'author', 'featured_media', '_links']どういう仕組みでしょう!?
public function get_context_param( $args = array() )
add_action('rest_api_init', function(){

    $controller = new class extends WP_REST_Controller
    {
        public function register_routes()
        {
            // get_item_schema()から読み込み用のargsの設定値を取得。
            $args = $this->get_endpoint_args_for_item_schema(WP_REST_Server::READABLE);

            // スキーマの`context`の列挙体から一覧をまとめてくる
            $context = $this->get_context_param();

            $args2 = [...$args, 'context' => $context];

            register_rest_route(
                'wp/v2',
                '/osakana',
                [
                    'methods' => 'GET',
                    'callback' => fn(WP_REST_Request $r) => rest_ensure_response('Hello Kurage!'),
                    'args' => $args2
                ]
            );
        }

        public function get_item_schema()
        {
            $this->schema = [
                '$schema' => 'http://json-schema.org/draft-04/schema#',
                'title' => 'kurage',
                'type' => 'object',
                'properties' => [
                    'p1' =>
                    [
                        'description' => 'P1 parameter',
                        'type' => 'string',
                        'minLength' => 10,
                        'maxLength' => 20,

                        // ここ見て
                        'context' => ['view']
                    ],
                    'p2' =>
                    [
                        'description' => 'P2 parameter',
                        'type' => 'string',
                        'enum' => ['takohachi', '8chan', 'takosuke'],

                        // ここ見て
                        'context' => ['edit', 'dummy-context']
                    ]
                ]
            ];

            return $this->add_additional_fields_schema($this->schema);
        }

    };

    $controller->register_routes();
});
では $this->get_context_param()の戻り値を見てみます。
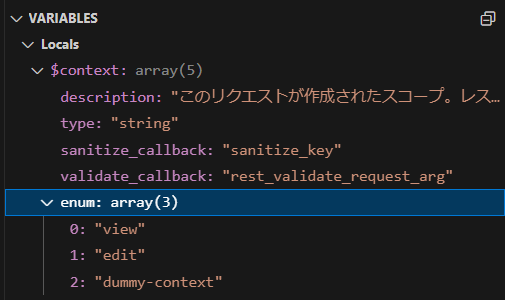
contextに使用できる値のリストを検証するスキーマを取得します。
よく見るとemunに「view, edit, dummy-context」が設定してあります。
何処からこの一覧を取得しているかというとスキーマのプロパティにcontextが指定してあるものをすべてマージします。
    // ここ見て
    'context' => ['view']

    // ここ見て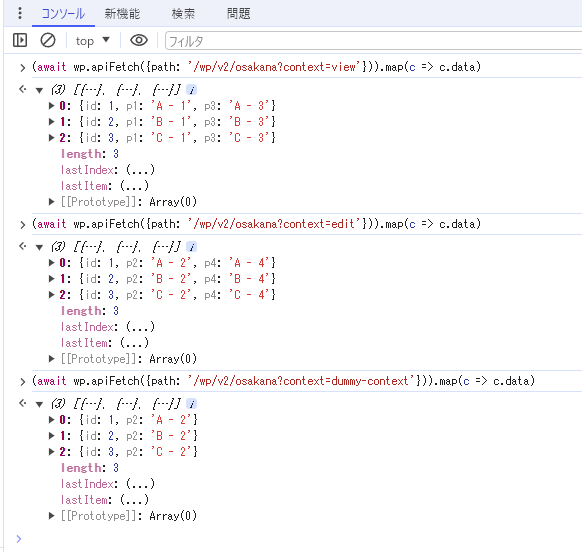
'context' => ['edit', 'dummy-context']つまりURLのクエリのcontextで使用できる一覧を設定してます。
/wp/v2/osakana?context=dummy-contextは成功しますが、
/wp/v2/osakana?context=hello-contextは失敗します。
もしデフォルト値を指定する場合は次のようにします。
$context = $this->get_context_param(['default' => 'view']);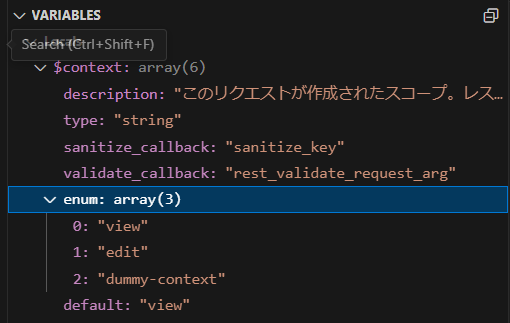
デフォルトでcontextはviewになってます。
ただこれだけでは意味がありません。
引き受けるクエリのパラメータ(context)の値のリストを取得してargsに指定しただけです。
これを活用するにはアイテムの取得時にリクエストからcontextの値を受け取ってごにょごにょしなければいけません。
実際にはアイテム取得時などにこの値を使ってフィルタリングします。
public function filter_response_by_context( $response_data, $context )
add_action('rest_api_init', function(){

    $controller = new class extends WP_REST_Controller
    {

        public function get_items($request)
        {
            $items = [];

            foreach(['A', 'B', 'C'] as $key => $value)
            {
                $item = new stdClass;
                $item->id = $key + 1;
                $item->p1 = "$value - 1";
                $item->p2 = "$value - 2";
                $item->p3 = "$value - 3";
                $item->p4 = "$value - 4";

                $items[] = $this->prepare_item_for_response($item, $request);
            }

            return rest_ensure_response($items);
        }

        public function prepare_item_for_response($item, $request)
        {
            $context = $request->get_param('context') ?? 'view';

            $data = [];
            $data['id'] = $item->id;
            $data['p1'] = $item->p1;
            $data['p2'] = $item->p2;
            $data['p3'] = $item->p3;
            $data['p4'] = $item->p4;

            $data = $this->filter_response_by_context($data, $context);
            return rest_ensure_response($data);
        }

        public function register_routes()
        {
            $context = $this->get_context_param(['default' => 'view']);

            register_rest_route(
                'wp/v2',
                '/osakana',
                [
                    'methods' => 'GET',
                    'callback' => fn(WP_REST_Request $r) => $this->get_items($r),
                    'args' => [
                        'context' => $context
                    ]
                ]
            );
        }

        public function get_item_schema()
        {
            $this->schema = [
                '$schema' => 'http://json-schema.org/draft-04/schema#',
                'title' => 'kurage',
                'type' => 'object',
                'properties' => [
                    'id' =>
                    [
                        'description' => 'ID',
                        'type' => 'integer',
                        'context' => ['view', 'edit', 'dummy-context']
                    ],
                    'p1' =>
                    [
                        'description' => 'P1 parameter',
                        'type' => 'string',
                        'context' => ['view']
                    ],
                    'p2' =>
                    [
                        'description' => 'P2 parameter',
                        'type' => 'string',
                        'context' => ['edit', 'dummy-context']
                    ],
                    'p3' =>
                    [
                        'description' => 'P3 parameter',
                        'type' => 'string',
                        'context' => ['view']
                    ],
                    'p4' =>
                    [
                        'description' => 'P4 parameter',
                        'type' => 'string',
                        'context' => ['edit']
                    ],
                ]
            ];

            return $this->add_additional_fields_schema($this->schema);
        }

    };

    $controller->register_routes();
});
ちょっと複雑になりました。
コントローラの実装方法はまたの機会に譲るとして、
get_items()は複数のアイテムを取得する時呼び出すようのメソッドです。
prepare_item_for_response()はアイテムを調整するための共有(作成したり取得したり)メソッドです。
prepare_item_for_response($item, $request)通常このprepare_item_for_response()内で使用します。
そしてフィルタリングは次のようにします。
$this->filter_response_by_context($data, $context);$dataは連想配列でフィールドを設定したものです。
このデータの中から、スキーマ中でコンテキストが有効なプロパティ以外は除外して取得します。
コンテキストがviewなら、「p1とp3及びid」が取得されます。
public function get_collection_params()
パラメータのコレクション一覧を作成します。
WordPressのREST APIのクエリのパラメータにはcontextが指定できるようになってます。
他にもページの指定が出来るpageや、1ページに最大何件表示するかを指定できるpre_page、検索に使用できるsearchなどがあります。
例えば投稿一覧を取得するREST APIを考えてみましょう。
通常の投稿一覧を取得する場合は次のようにします。
/wp/v2/postsもし20件ずつ取得したければ以下のようにします。
/wp/v2/posts?per_page=20' もし20件ずつ表示、2ページ目を取得したければ以下のようにします。
/wp/v2/posts?per_page=20&page=2' 他は省略しますが、この四つのプロパティを一度に作成してくれるのがこのメソッドです。
add_action('rest_api_init', function(){

    $controller = new class extends WP_REST_Controller
    {
        public function register_routes()
        {

            // ここの値
            $args = $this->get_collection_params();

            register_rest_route(
                'wp/v2',
                '/osakana',
                [
                    'methods' => 'GET',
                    'callback' => fn(WP_REST_Request $r) => rest_ensure_response('Hello Kurage!'),
                    'args' => $args
                ]
            );
        }

        public function get_item_schema()
        {
            $this->schema = [
                '$schema' => 'http://json-schema.org/draft-04/schema#',
                'title' => 'kurage',
                'type' => 'object',
                'properties' => [
                    'id' =>
                    [
                        'description' => 'ID',
                        'type' => 'integer',
                        'context' => ['view', 'edit', 'dummy-context']
                    ],
                    'p1' =>
                    [
                        'description' => 'P1 parameter',
                        'type' => 'string',
                        'context' => ['view']
                    ]
                ]
            ];

            return $this->add_additional_fields_schema($this->schema);
        }

    };

    $controller->register_routes();
});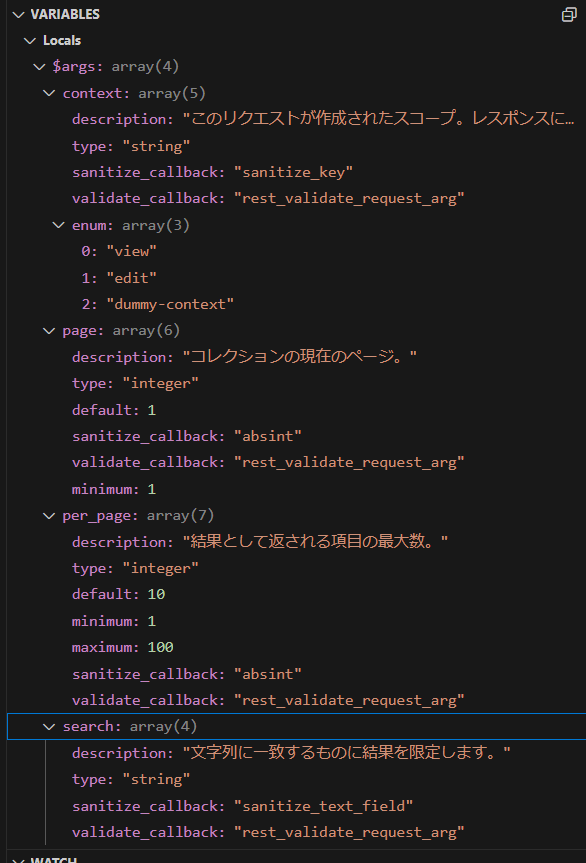
これを見ると「context, page, per_page, search」の設定を取得出来ています。
これをargsに指定すればいいだけです。
フィールド指定によるフィルタリング
コンテキストより細かく取得するフィールドを制御できるのがこの方法です。
public function get_fields_for_response( $request )
クエリに_fieldsを渡すことで取得出来るフィールドを選択する仕組みを提供します。
内部的にはスキーマのpropertiesのリストと、追加フィールド(次回説明)のリストをマージしたキー一覧(フィールド一覧)を取得します。
追加で_linksが追加されていたり、クエリに_embedがあると_embeddedが追加されたりとします。
まずはコードを見ていきます。
add_action('rest_api_init', function(){

    $controller = new class extends WP_REST_Controller
    {
        public function register_routes()
        {
            register_rest_route(
                'wp/v2',
                '/osakana',
                [
                    'methods' => 'GET',
                    'callback' => function(WP_REST_Request $r)
                    {
                        // ここの値
                        $fields = $this->get_fields_for_response($r);

                        rest_ensure_response('Hello Kurage!');

                    }
                ]
            );
        }

        public function get_item_schema()
        {
            $this->schema = $this->schema ?? [
                '$schema' => 'http://json-schema.org/draft-04/schema#',
                'title' => 'kurage',
                'type' => 'object',
                'properties' => [
                    'uni' => [
                        'description' => 'toge toge',
                        'type' => ['string', 'null']
                    ],
                    'kame' => [
                        'description' => 'noko noko',
                        'type' => ['string', 'null'],
                    ],
                    'ikasan' => [
                        'description' => 'I am 10 legs!',
                        'type' => ['string', 'null']
                    ],
                    'takosan' => [
                        'description' => 'I am 8 legs!',
                        'type' => ['string', 'null']
                    ]
                ]
            ];

            return $this->add_additional_fields_schema($this->schema);
        }

    };

    $controller->register_routes();
});よって_fieldsを付けづREST APIにアクセスした場合、
$fields = $this->get_fields_for_response($r);$fieldsの値は以下のようになります。
/wp/v2/osakana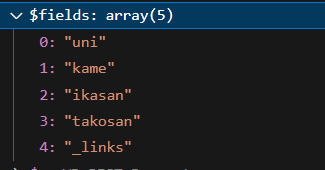
次にフィールド一覧に「uni, hitode, takosan, kani」を追加します。
フィールド一覧にはuniとtakosanのみ存在しており、それ以外は除外されて取得されます(hitodeとkaniはそもそもフィールドに存在しないので取得されることはありません)。
/wp/v2/osakana?_fields=uni,hitode,takosan,kani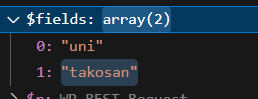
ドットで区切られた先頭のワードにも引っかかります。
例えば、ikasan.comは先頭のikasanがフィールド一覧に存在するので取得されます。
/wp/v2/osakana?_fields=uni,hitode,takosan,kani,ikasan.com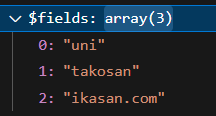
クエリパラメータの_fieldsをスキーマと照らし合わせて有効なフィールド一覧をかえしているのがわかります。
ではこの関数は何のためにあるのかですが、rest_is_field_included()と共に$this->prepare_item_for_response()内などで使用します。
以下はprepare_item_for_response()を実装するのが面倒なので直接コールバックでまとめてます。
add_action('rest_api_init', function(){
$controller = new class extends WP_REST_Controller
{
public function register_routes()
{
register_rest_route(
'wp/v2',
'/osakana',
[
'methods' => 'GET',
'callback' => function(WP_REST_Request $r)
{
// ダミーのアイテム
$item = new stdClass;
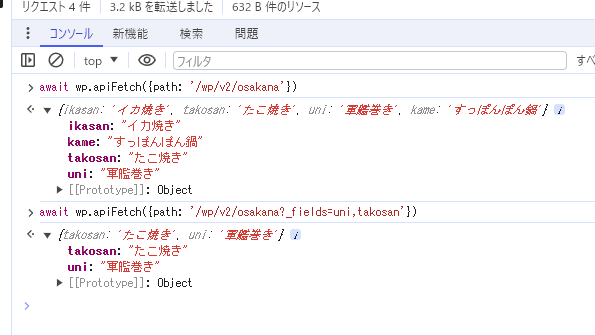
$item->ikasan = 'イカ焼き';
$item->takosan = 'たこ焼き';
$item->uni = '軍艦巻き';
$item->kame = 'すっぽんぽん鍋';
// ここ注目
$fields = $this->get_fields_for_response($r);
// まず空の配列を用意。
$data = [];
if( rest_is_field_included( 'ikasan', $fields) )
{
$data['ikasan'] = $item->ikasan;
}
if( rest_is_field_included( 'takosan', $fields) )
{
$data['takosan'] = $item->takosan;
}
if( rest_is_field_included( 'uni', $fields) )
{
$data['uni'] = $item->uni;
}
if( rest_is_field_included( 'kame', $fields) )
{
$data['kame'] = $item->kame;
}
// フィールド一覧に入っているフィールドの値だけを抽出してから返す。
return rest_ensure_response($data);
}
]
);
}
public function get_item_schema()
{
$this->schema = $this->schema ?? [
'$schema' => 'http://json-schema.org/draft-04/schema#',
'title' => 'kurage',
'type' => 'object',
'properties' => [
'uni' => [
'description' => 'toge toge',
'type' => ['string', 'null']
],
'kame' => [
'description' => 'noko noko',
'type' => ['string', 'null'],
],
'ikasan' => [
'description' => 'I am 10 legs!',
'type' => ['string', 'null']
],
'takosan' => [
'description' => 'I am 8 legs!',
'type' => ['string', 'null']
]
]
];
return $this->add_additional_fields_schema($this->schema);
}
};
$controller->register_routes();
});連想配列$dataに有効なフィールドのみを設定してレスポンスを返しています。
以下のREST APIに接続するとします。
以下はフィールド指定なしでアクセスした場合。
/wp/v2/osakana以下はuni及びtakosanを指定した場合です。
/wp/v2/osakana?_fields=uni,takosan結果は以下のようになります。
主にprepare_item_for_response()内で使用されているようですが、
追加フィールドを追加する際「$this->add_additional_fields_to_object()」の実行時にも使用されています。